

Google Analytics 4: How to Switch from UA to GA4
Share on Social
Array
(
    [networks] => Array
        (
            [0] => facebook
            [1] => twitter
            [2] => pinterest
            [3] => linkedin
        )

    [has] => Array
        (
            [facebook] => 1
            [twitter] => 1
            [instagram] =>
            [pinterest] => 1
            [houzz] =>
            [linkedin] => 1
        )

)

Prepare for the Future with Google Analytics 4
Today, businesses have to learn how to navigate the challenges that come with understanding the complexities of the digital landscape while simultaneously prioritizing the privacy and security of users. This is one of the many reasons why Google is phasing out Google Universal Analytics (UA) and switching all users to Google Analytics 4 (GA4), their next-generation measurement solution.
With privacy laws evolving daily, Google has adapted its approach to analytics to address new measurement standards while helping businesses achieve success. Google Analytics 4 is the new standard for measuring user data and delivering an insightful analytics experience. Plus, it’s built to keep up with the changing digital ecosystem. For anyone still relying on Universal Analytics, it’s important to start transitioning to Google Analytics 4 going forward.
Starting July 2023, Google Universal Analytics will stop processing new hits, and at some point soon, existing Universal Analytics properties will no longer be available. This blog will explain what Google Analytics 4 is, what will happen to Universal Analytics, and how to make the switch.
What is Google Analytics 4 (GA4)?
Google Analytics 4 is the new and improved version of Google Universal Analytics. It collects data from websites and apps, so business owners can better understand the customer journey. Instead of using session-based data like in UA, G4 uses event-based data. In addition, G4 also includes privacy controls like cookieless measurement. To learn more about the vast capabilities of GA4, check out their introductory blog.
What Is Going to Happen to Google Universal Analytics (UA)?
If you are still using UA, you will have until July 1st, 2023, to continue to use and collect new data in your Universal Analytics properties. After that, you will still be able to access data that has already been processed for approximately six months. However, Google recommends that you export historical reports during this time to avoid losing any valuable information.
How to Switch from UA to GA4: GA4 Training
LaLa Projects can help facilitate this switch by setting up a Google Analytics 4 property for you. If you would like us to take care of it for you, contact us, and we will get started on transitioning your website from UA to GA4.
However, if you would like to do it yourself, below are instructions for switching from UA to GA4. If you already have Universal Google Analytics set up and installed, this is how to set up a Google Analytics 4 property for a site that already uses analytics. If you are a visual learner, check out this step-by-step Youtube video.
Step One: Log Into your UA account
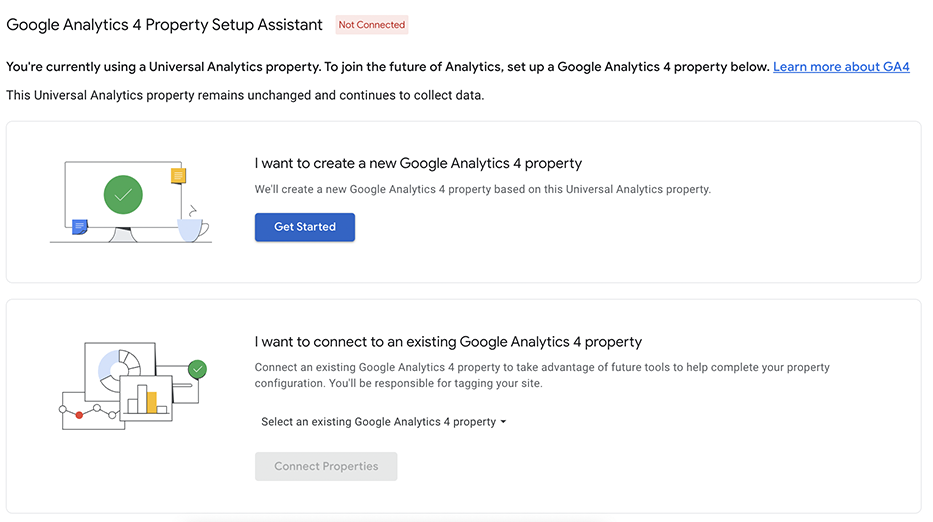
When you first log into your Universal Google Analytics account, there will be three columns; Account, Property, and View. At the top of the Property column, click the option titled G4 Setup Assistant.

Step Two: Create a New Property
To create a new property, get started by clicking I want to create a new Google Analytics 4 property. This will not copy historical data or eliminate data within your old UA property. However, at some point in 2023, Google will be getting rid of old UA data, so we recommend saving all reports as a precaution. The wizard will copy basic settings from your Universal Analytics property and activate Enhancements Measurements.
*If your website supports the gtag.js tag and you do not use Google Tag Manager, you may have the option to Enable data collection using your existing tags.
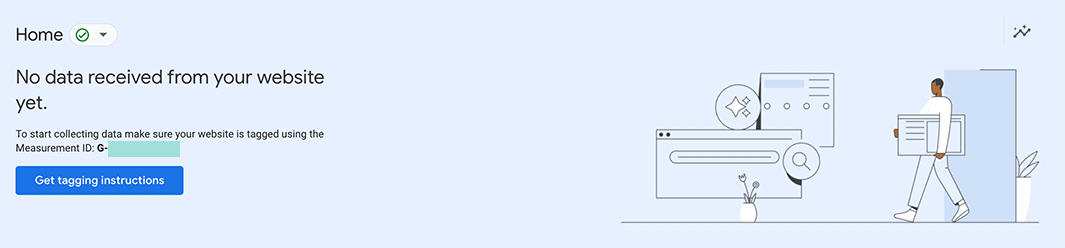
Step Three: Find your Google Measurement ID
After creating a new property, we can now click on the new property, a pop-up banner on the top of the screen will show you your new Google Measurement ID. Copy this code, and we will add it into the WordPress website.
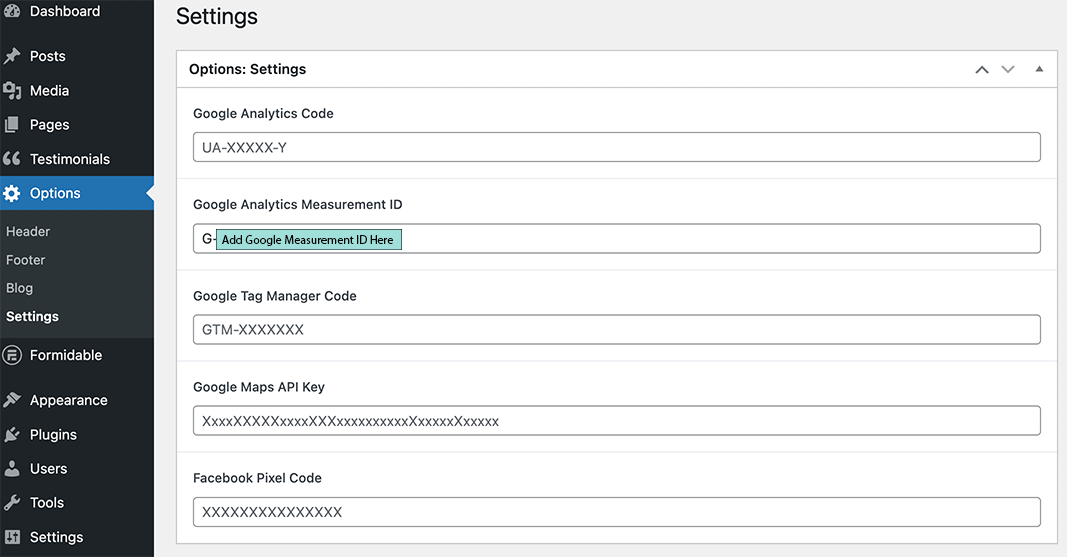
Step Four: Add Google Measurement ID to Website
Now that you have the Google Measurement ID copied, head to the Admin section of your WordPress website. On the left-hand side of the dashboard, you will see an Options menu. Put your cursor over it and click on Settings. Here, you will add in your Google Measurement ID.
*This OPTIONS menu is unique to the LaLa Theme 3 and 4 so, not all WordPress themes will look exactly like this.
Step Five: Confirm Changes with Google
Now that you have added your new Google Measurement Id to your website, you can head back over to your Google Analytics portal. It might take some time, but you should get this notification once everything is set up that your website’s data collection is active!
